
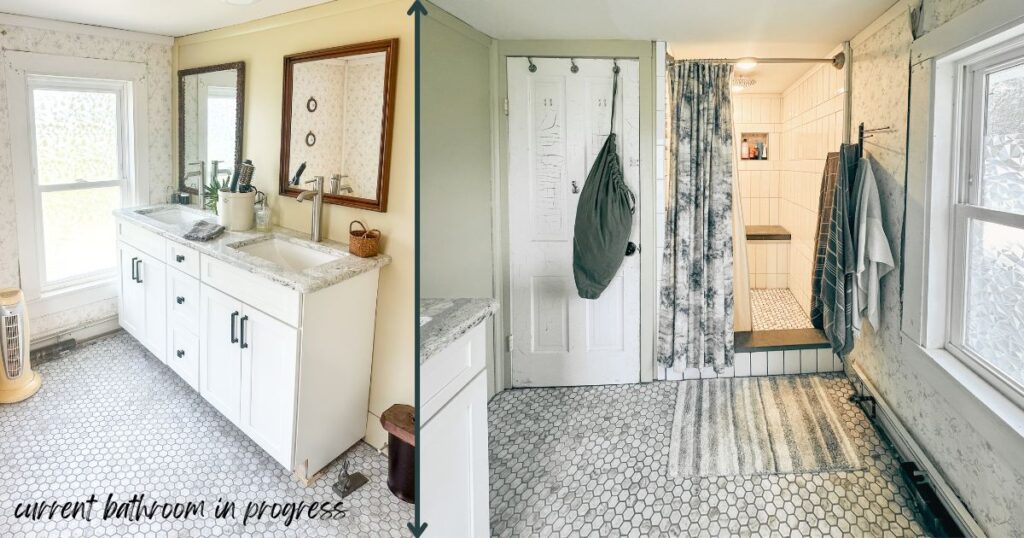
I’m so happy to say we are in the homestretch of this bathroom remodel. This has been a long time coming. We tore out the shower in the fall of last year, and now it’s summer time. So almost a full year of working on this whole room remodel little by little.
The shower itself took the longest to remodel. It took us awhile to get it reframed and ready for tile. Then the tile took a good week to finish. So thankful for the handy men in our family between the Dads and my husband. I chipped in but it was mostly them.
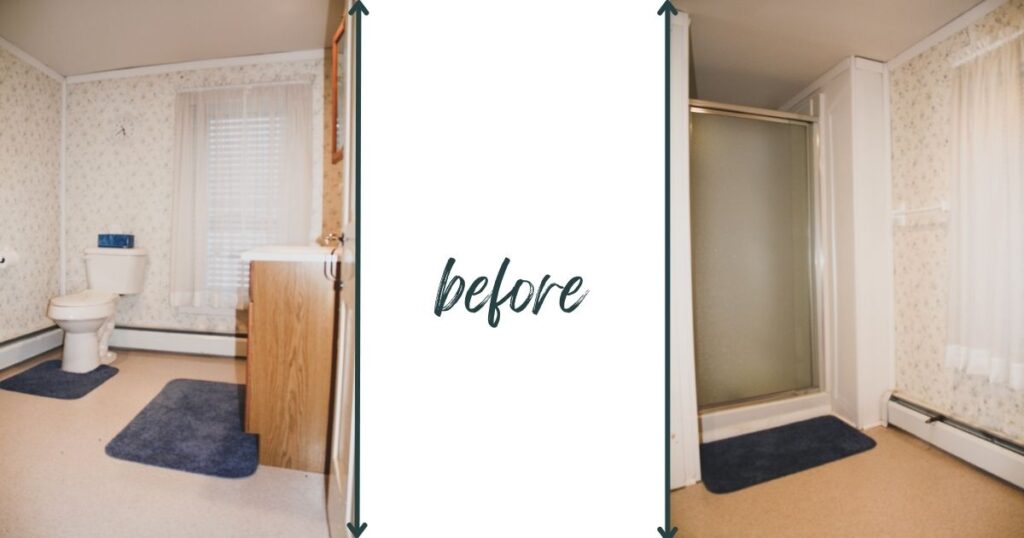
Bathroom Remodel-Shower Update
As you can see before we had a pretty standard almost coffin sized shower. It just didn’t seem like a good use of the space. There was about a foot of space to the right that was not being used, and space behind that standard shower insert.
Luckily we had my Dad to help with the framing, cement board and then the rubber mat and waterproofing. Basically everything until you get to the tiling phase, which my Father-in-law helped us with. My husband had the great idea to use stone on the bench and then we decided to do the curb of the shower as well (we used blue stone from a local place).
If you have room to do a bench I say go for it. I’ve used it more than I thought I would. Also the niches have worked out well. I would not do any less though. If we had a good spot to put another one I totally would have. They fill up fast.

I’m so glad we went with two lights in there. It seemed like overkill at first but it is really nice to see when shaving. Also making them dimmable has been really great. The big rain shower head in the middle has worked so well, and the handheld shower head is great for cleaning the shower.
Of course I love the shower itself, and it’s the best part of the bathroom remodel in my opinion. The shower curtain is probably my favorite single thing in the bathroom though. I just love the colors and the organic shapes that help offset all the hard lines that are kind of unavoidable in a bathroom. (It’s an old pottery barn shower curtain I found on Ebay)
Bathroom Remodel-Paint Update
So I ended up hand mixing this wall color. I wanted the color natural twine by Behr, but I was trying to save money by using Valspar paint. So the color Valspar has that looks similar is baked scone. That’s the paint color I ended up starting with.
I actually painted the wall this color to try it and it was more yellow than I was hoping for. I didn’t like it with the shower curtain especially it just felt kinda cheesy. So I did very little research and I mixed a pinky red and a dark green/blue that I had on hand to make purple. Then I added that little by little to the baked scone color to get this more tan/twine color.
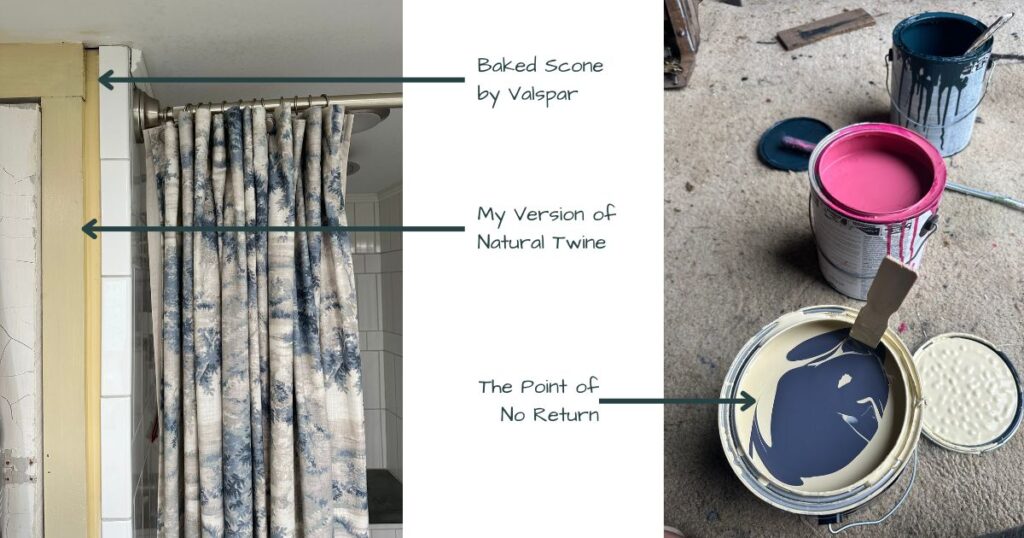
I honestly love it, and I think it’s pretty cool to have a color that not everyone can just get at their paint store. I may regret that down the line, but for now I have more than enough to finish out this room.
Bathroom Remodel-Vanity Update
We started out with a very basic 30″ vanity that you can find at any big box hardware store. It wasn’t enough storage for us so we pretty quickly changed it out for a dresser that came with the house. I just painted it and added new hardware. Slapped an amazon sink on top and called it a day.
That vanity worked for awhile, but obviously once we started having kids the top of that dresser got pretty beat up. With all the water and wear and tear it became pretty clear that we were going to need to either find a stone top for it or find a new vanity.

For a long time I was convinced that a new stone top would be just the right thing. After awhile it became clear to me that I wanted drawers that were easy to open and close, and that we had tall items that did not fit in the drawers.
I searched for awhile for just the right piece on marketplace. I really wanted it to be old so that it would go with the 100 year old house we have. Eventually I realized it’s impossible to find easy close drawers and an old piece of furniture without taking on another project.
My Mother-in-law found this vanity on Facebook marketplace listed by a showroom employee. It was a floor model in this showroom and they were ready to change it out. So it came with the stone and faucets for $550 I believe it was. It was a great price, and I didn’t have to go find all those things separately. It seemed like too good of a deal to pass on. We’ve been really happy with it, and it was one of the easiest updates in this room honestly.
What’s To Come-Punch List
The major thing I am looking forward to is adding painted beadboard to the two wallpapered walls. The wallpaper is literally peeling off it’s so old and the humidity in here has gotten to it. I plan on painting the beadboard the same natural twine knock off that I mixed. When the headboard is up I think that it is going to really make it seem so much more complete.
I would like to build a cabinet that looks somewhat old for over the toilet. I might use some scrap bead board for the door or something I’m not sure yet. We need to squeeze as much storage in here as possible with 5 of us living here. Plus the older the kids get the more storage they are going to need I’d imagine.
I will be replacing some of the trim in here as well. They used standard new house door trim for the crown and it bugs me. I plan on replacing it with flat trim pieces like what’s around the windows. In some places I would like to add some pegs to this flat trim to add more towel hanging options.
I can’t wait to share the final results. Thank you for visiting our farmhouse. If you are into home renovations/makeovers you can find more of those here. If you are into diy projects like myself you can find those here. To see pictures from when we first moved into our 100 year old farmhouse click here.